Nest Thermostat Calibration: Impossible or Possible?
Hey there! This post contains affiliate links to products. We may receive a commission for purchases made through these links. But it never influences our product selection process.
Suppose you get into the house and found the thermostat is not working.
Now this situation can be pretty hectic.
So, you have decided to fix the thermostat.
Now, the question is, ‘Is Nest thermostat calibration possible?’
It is possible to calibrate the Nest thermostat. To do so, turn off the thermostat. Then start it again. A circular dialer will arrive at the screen of the thermostat. Keep tapping it until the display of the thermostat turns dark. This way, the thermostat gets calibrated.
Now, to perfectly calibrate the thermostat, you will need some specific knowledge.
Hence I bring forth this article, describing the process of calibrating the thermostat. Perfectly.
So, what are we waiting for then? Off we go!
Can You Calibrate Nest Thermostat?
The answer is yes. Nowadays, most thermostats can be calibrated. Especially, the nest thermostats. In fact, they all come with a built-in mechanism.
Over time, the performance of the thermostat can decrease. Even worse it can get permanently damaged.
Solution? You have to calibrate the thermostat.
How to Calibrate the Thermostat?
Well, you know that thermostats can be calibrated.
The next thing you may think is, ‘how do I calibrate my thermostat?’
You don’t need to worry about it a bit. Generally, the calibration contains two major steps. Firstly, you have to tune the thermostat. And finally, you have to check whether the calibration is okay or not.
And guess how long does it take Nest Thermostat to calibrate? Only around 5 minutes!
To ease you out, I have described the whole step by step here. You simply have to follow them. And the calibration will simply become easy like fixing the amplifier one channel.
Let’s check them out, shall we?
Step 01: Restart
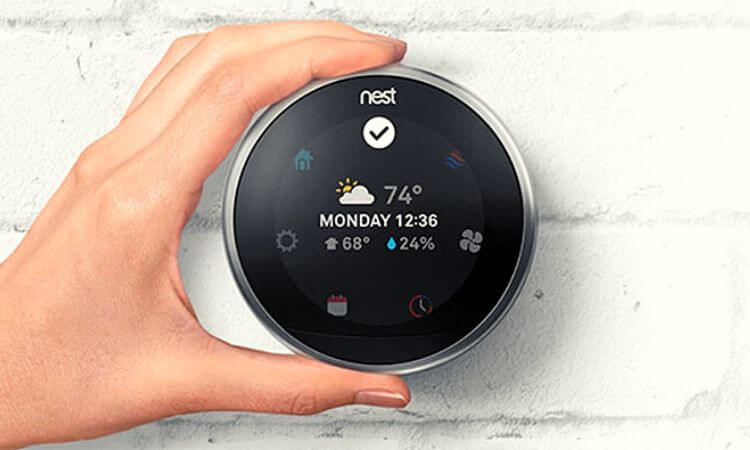
So, to calibrate the thermostat, you need to restart it first. To do so, open up the Nest thermostat app, from where most of the Nest thermostat adjustments are done.
Then from the menu, go to the settings. From this Nest thermostat settings, you have to search for the restart options.
Simply tap that option and the thermostat will restart.
However, if you can not restart the thermostat with the app, there is another way. You can manually turn off the thermostat. Then, start it again.
Step 02: Calibrate
Now time for Nest thermostat temp calibration.
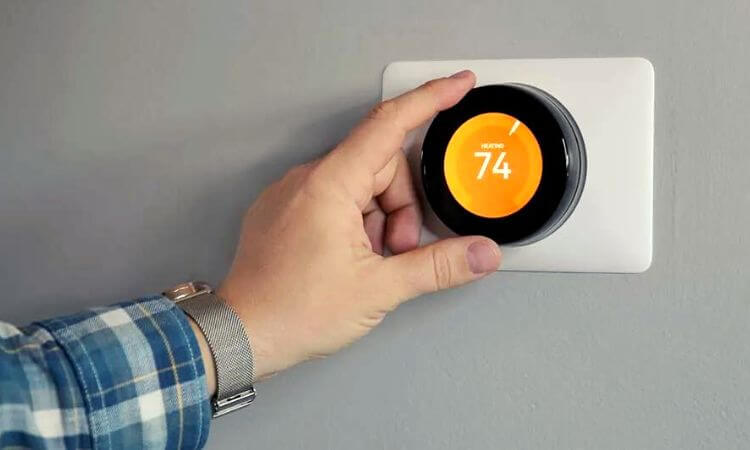
Once the thermostat reactivates, you will find a dialer. This usually appears on the display of the thermostat once it gets activated.
Even it will appear in the application you are using for the thermostat.
Once you find the dialer, you have to tap it. After tapping it for a while, the screen of the thermostat will turn black. This is basically when the calibration process starts.
While the display gets dark, the thermostat saves all necessary information. And afterward, the thermostat will reboot again.
Instead of the dialer, there is another way to calibrate the thermostat as well. For that, again go to the Nest thermostat settings menu. Then search and choose the ‘factory reset function’.
This way, all the features of the thermostat get reset. And basically, this is how the Nest calibrates temperature, swing, and other parameters.
Step 03: Test
Now, the last and final step of the calibration process. You have to check whether the thermostat works perfectly or not. If yes, then the calibration was successful.
Otherwise, you may have to calibrate the thermostat again.
Once the calibration is done, use it and observe the data. Take a record of the readings.
Afterward, take another thermostat that works properly. Use it to write down the readings.
Now, compare the readings of both the calibrated thermostat and the perfect thermostat.
If the readings are okay, then congratulations! Your Nest thermostat is perfectly calibrated.
The thermostat has been calibrated. Now what? Probably you will need some C-wire adapters to install the thermostat! For that you can check these out:
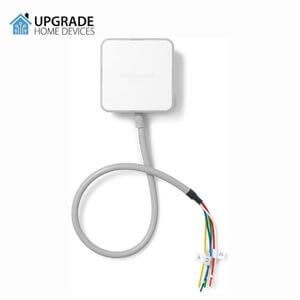
Honeywell Home C-Wire Adapter for Wi-Fi Thermostats
- Brand: Honeywell Home
- Color: White
- Style: Smart and Wi-fi
- Item Weight: 0.28 Pounds
- Power Source: Adapter
- Voltage: 24 Volts
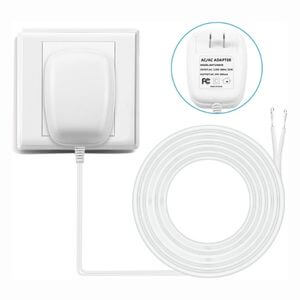
WUYELIN C-Wire Adapter Thermostat
- Brand: WUYELIN
- Power Source: Corded Electric
- Cable: 25Foot
- Dimensions: 2.3 x 1.8 x 2.5 inches
- Mounting Type: Embedded
- Current Rating: 300 Milliamps
They are the top-notch adapters right now. Hurry before they run out of stock!
A Few Precautions
Well, up to now, we have learned about the basic calibration process for the Nest thermostat.
However, this is not the end. There are a few things you should keep in mind. After all, during calibration, anything can go wrong. Unless you know about these few facts.
Check the Mercury:
Before calibrating the thermostat, it is better to check the mercury carrier of the thermostat.
Sometimes, the tube that carries the mercury can get folded. As a result, the thermostat may fail to work properly.
Not only that. Even if you have your Nest thermostat in the optimal setting, it may still create issues.
So, if the tube is folded, unfold it. Thus, you can smoothly carry out the calibration operation.
Also, if the thermostat gets fixed for this, then you might see that the Nest thermostat is adjusting itself!
Keep the Thermostat Clean:
Whether have a problem or not, always keep the thermostat neat and clean.
Not only that you can quickly adjust the thermostat. The thermostat will also stay in a good shape like this.
Thus before calibrating the thermostat, open the thermostat. Check out for any dust.
And gently clean all the parts of the thermostat. For cleaning, you can use firm cleaning tools such as brushes and soft cloths.
Well, keep these factors in mind. And you won’t have to face any problems in calibrating the thermostat at all.
Since you have calibrated the thermostat, you can now see how to turn off eco mode on nest thermostat.
Frequently Asked Questions (FAQs)
Nest Vs Hive, Which One Is Good?
Is It Possible To Use The Nest Thermostat Without C-Wire?
Is It Possible To Remove The Thermostat?
Is There Any Way To Connect The Nest Thermostat With Google?
Concluding Thoughts
It’s all I had on Nest thermostat calibration.
I guess our journey ends here.
However, if you still have any confusion, don’t worry. You can go to any HVAC professionals and ask for help from them!
My time has come to leave then.
Have a blissful day fellow reader!
![The Blue Light On Alexa Won’t Turn Off [Solved]](https://upgradehomedevices.com/wp-content/uploads/2023/02/solid-blue-light-on-alexa-wont-turn-off.webp)

One Comment